Introduction
Assume you have made a custom controller (say with Arduino) and you want to use it (instead of HTC Vive Controller) to play SteamVR games (like Beat Saber). Here I describe a hack to achieve that. I assume your controllers send data to your PC via a USB serial port.
The entire completed project is available here.
What this article is not about
In this article, we are not going to build a custom-made controller. We assume your controller sends data to a USB port using textual serial communication. Something like the following that includes positional and rotational information of the controller:
pos: 1.00000,0.00000,1.00000 rot: 0.99985,-0.00356,-0.00462
We assume the format of the above message is like:
pos: x, y, z rot: pitch, roll, yaw
This article is not about Razer Hydra controllers. We only use its driver to communicate to SteamVR. No Razer Hydra hardware is required. You only need to have a working HTC Vive System.
Step-by-step Explanation
The following diagram shows the overall structure of the system we are going to build:
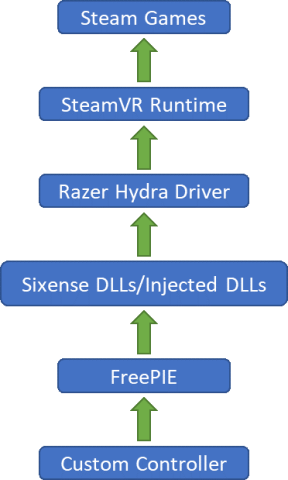
Figure 1. Dataflow from our custom controller to a SteamVR game.
Step 1: Install SteamVR Driver for Razer™ Hydra.
After installation, you should see the folder “SteamVR Driver for Razer Hydra” in this path:
C:\Program Files (x86)\Steam\steamapps\common
This folder contains the Razer Hydra Driver we talked about.
Step 2: Download and Modify FreePIE source code.
Download FreePIE source code from here.
2.1 Copy and Rename Fake DLLs (DLL Injection)
Once downloaded and unzipped, find the following files (usually in the directory “FreePIE-master\Lib\Sixense\Emulation\Binary”):
1. sixense_fake.dll
2. sixense_fake_x64.dll
Put these files in the followings respectively:
- sixense_fake.dll –> C:\Program Files (x86)\Steam\steamapps\common\SteamVR Driver for Razer Hydra\hydra\bin\Win32
- sixense_fake_x64.dll –> C:\Program Files (x86)\Steam\steamapps\common\SteamVR Driver for Razer Hydra\hydra\bin\Win64
You can probaly find two files called “sixense.dll” and sixense_x64.dll inside these directories respectively. Remove or rename them to something else (I would add the prefix “old_” to their names.)
Afterwards, rename the fake dlls (by removing the “_fake” from them):
- sixense_fake.dll –> sixense.dll
- sixense_fake_x64.dll –> sixense_x64.dll
Basically, we have removed the genuine dlls with fake ones. This is called DLL injection. The injected code (fake dlls) reads FreePIE data instead of a real Razer Hydra hardware. If you don’t trust these dlls and don’t want to run them on your computer, you can read the source code and build them yourself from the github page.
2.2 Modify FreePIE source code
We are going to change the source code and add a plugin to it so that it reads data from a USB port. I assume your custom device send the positioning/clicking data in string format and is connected to a USB port on your computer.
Open the solution file “FreePIE.sln” with Visual Studio. This solution consists of several projects including “FreePIE.Core.Plugins”. In the Solution Explorer (right pane), right-click on the project “FreePIE.GUI” and select “Set as Startup Project”.
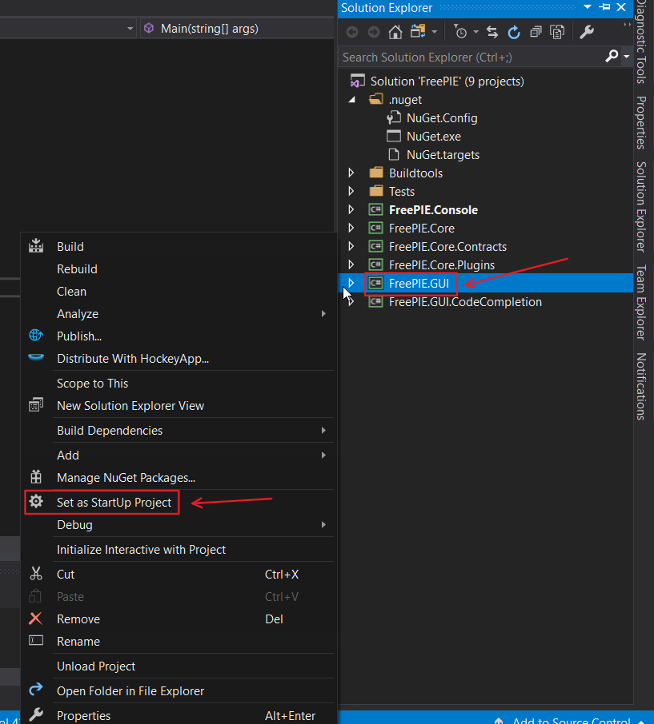
Now run the solution by clicking on the green play button or go to Debug > Start Debugging (F5).
Most likely, you will get this run-time error:
“An attemp was made to load an assembly from a network location which would have caused the assembly to be sandboxed in the previous versions of .NET Framework… .”
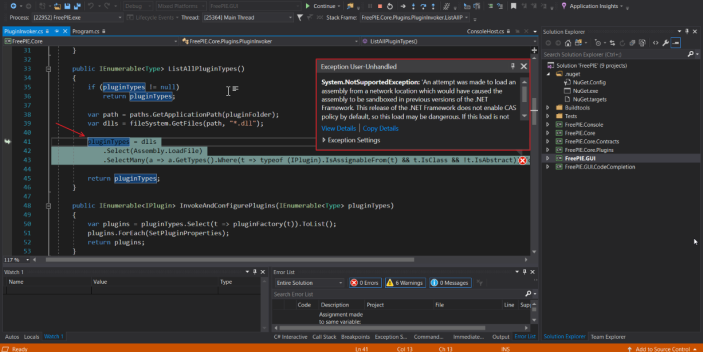
Why is that? Because for security reasons, Windows is not allowing the program to load some dlls (they could be viruses). But as we know they are not, we can tell it that it’s OK to load them. For doing so, hover your mouse over “dlls” variable and see its contents:
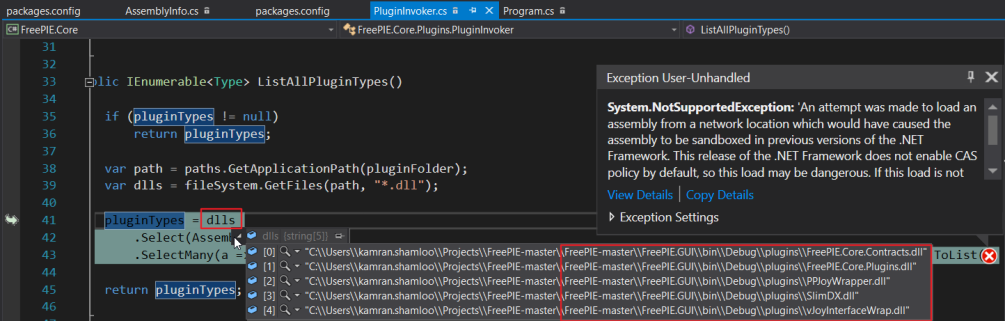
Take a note of these dlls name and location. All of them reside in FreePIE-master\FreePIE.GUI\bin\Debug\plugins folder. Go there and right-click on each of them individually and choose “Properties”.
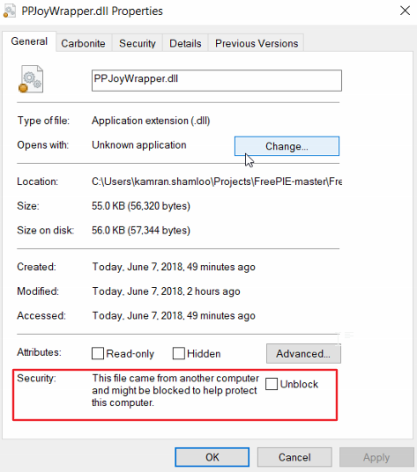
If you see “Unblock” in this dialog, mark it so that your program can load it. In my case, “PPJoyWrapper.dll”, “SlimDX.dll” and “vJoyInterfaceWrap.dll” had the Unblock option (meaning that Windows has blocked them).
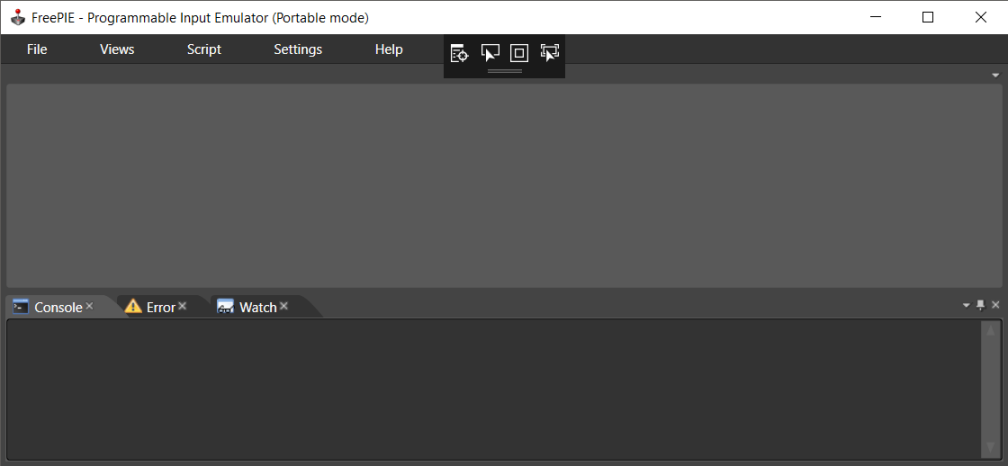
Now go back to your FreePIE application and run it. This time it should run without any issue. It displays this:
Select File > New. You see a new empty document ready for you. In this script, we write IronPython code. With IronPython you have access to .Net libraries but not built-in python libraries! The weird thing about the workflow of FreePIE is that it runs all the script repeatedly! Practically, it’s like the whole script is inside an infinite while loop. You cannot define new python classes and you got to use only this single script i.e. you cannot spread your application over several script. Because of these limitations, I decided to write a minimum python script that sets up the Razer Hydra controller in VR and write everything else in C# side (which I will explain later.)
Let’s get back to the FreePIE script. This script’s responsibility is to grab the data from our custom FreePIE plugin (not explained yet) and give it to Sixense DLLS/Fake Dlls. These fake dlls send data to Hydra driver which subsequently gives it to SteamVR. As mentioned before, we don’t need Razor Hydra hardware. We only use its driver to be able to communicate with SteamVR (in near future, I will write another article explaining how to develop a SteamVR driver from scratch and not to use FreePIE or fake dlls at all).
The following is the minimum code (“hydra_setup_brief.py”) required to set up the Razer Hydra controllers in SteamVR:
global pressed
def handleStartButton():
  global pressed
  if pressed == 0:
    if keyboard.getKeyDown(Key.Space): # For holding two system buttons (start buttons) at the same time.
       # holding two system buttons causes the controllers to be set at the HMD position.
      hydra[0].start = True
      hydra[1].start = True
      pressed = 1
    elif keyboard.getKeyDown(Key.Backspace): # For clicking the start button (system button) to bring up the steam menu.
      hydra[0].start = True
      pressed = 1
  elif keyboard.getKeyDown(Key.Backspace):    # For situations in which the start button (system button) is
                                              # hold down to bring the turn off menu).
    pressed = 1
  else:
    hydra[0].start = False
    hydra[1].start = False
    pressed = 0

def init_hydra(index):
  if index == 0:
    hydra[index].x = 65
    hydra[index].y = -45
    hydra[index].z = -200
    hydra[index].side = 'R'
  else:
    hydra[index].x = -65
    hydra[index].y = -45
    hydra[index].z = -200
    hydra[index].side = 'L'
  hydra[index].yaw = 0
  hydra[index].pitch = 0
  hydra[index].roll = 0
  hydra[index].start = True
  hydra[index].isDocked = False
  hydra[index].enabled = True
  hydra[index].trigger = 0
  hydra[index].three = 0
  hydra[index].four = 0
  hydra[index].one = 0
  hydra[index].two = 0
  hydra[index].bumper = 0
  hydra[index].joybutton = 0
  hydra[index].joyx = 0
  hydra[index].joyy = 0

def vive_controllers_init():
 init_hydra(0)
 init_hydra(1)

def update():
 handleStartButton()

if starting:
  pressed = 0
  vive_controllers_init()

update()
Save the script. Before going any further, let’s test it. Open Steam and run SteamVR (its icon is in the top-right corner). Run the script by selecting the command Script > Run Script. Now wear the Vive headset.
If you see the following message, press the Spacebar on the keyboard. Afterwards, you should be able to see two controllers. You may want to press Spacebar again to bring the controllers in front of you.

Figure 2. If you see this message, press the Space key on your keyboard.
Now it’s time to add a plugin to read the data from a USB port connected to your Arduino (or any other device connected to the USB port.)
1. Find the file cs (it should be in the folder FreePIE.Core.Plugins).
2. Make a copy of it and rename it to cs
3. Open MyPlugin.cs and rename all occurrences of “AhrsImu” to “MyArduino”. Also make sure you have the following:
[Global(Name = "myArduino")]
This name “myArduino” will show up in FreePIE editor when you are writing an IronPython script.
Before going any further, let’s see what is going on here. MyArduinoPlugin class is derived from ComDevicePlugin class (aka the parent class). The parent class follows a Template Method design pattern. In this pattern, the parent class is defining a skeleton of an algorithm (i.e. reading from a COM device) but delegating some of its steps to its subclasses (MyArduino). Which steps does it delegate? The abstract methods:
protected abstract void Init(SerialPort serialPort);
protected abstract void Read(SerialPort serialPort);
protected abstract string BaudRateHelpText { get; }
protected abstract int DefaultBaudRate { get; }
The Init(…) method (implemented in the child class MyArduinoPlugin) runs once and it sets up the serialPort object.
The Read(…) method runs continuously and runs every time the IronPython script runs. They both run in the same loop. So if the Read(…) method stops or gets slows, the script stops or get slow too. There is a mechanism in FreePIE that halts when such a thing happens. In other words, it crashes. That’s why we should avoid reading COM port in this method. Reading the serial port can be time-consuming and the command serialPort.ReadLine() is a blocking command meaning that the execution of the program is blocked till we get a message from the Arduino. If the Arduino sends the data slower than what FreePIE expects (say 100 Hz), FreePIE crashes. To prevent that, we will create a new thread separate from the Read(…) thread. But before doing so, proceed to the next steps to implement this quick and easy changes.
4. In the class MyArduinoPlugin, update the two properties BaudRateHelpText and FriendlyName as desired. These will show up in the UI and help user to find the plugin.
protected override string BaudRateHelpText
{
get { return “Baud rate, default on MyArduino should be 921600”; }
}
public override string FriendlyName
{
get { return “MyArduino Plugin”; }
}
5. Find the property “DefaultBaudRate” and change it to the baud rate of your Arduino device. My device has the baud rate of 921600.
protected override int DefaultBaudRate
{
    get { return 921600; }
}
6. Now it’s time to setup the serialPort object and create a new thread that reads the COMP port. Go to Init() method in the MyArduinoPlugin As I said before this method runs once and set up the serial port. It also creates a new thread that read the data from the USB continuously.
protected override void Init(SerialPort serialPort)
{
    // Initialize the member variable.
    _serialPort = serialPort;
    // (optional) wait for IMU
    //Thread.Sleep(3000);
    // Set the timeout i.e. if 2000 ms passed and no data is received,
    // throw an exception.
    _serialPort.ReadTimeout = 2000; // 2 sec
    // (optional) Here you can send a signal to the Arduino telling it
    // to start sending data.
    // You might not need it though.
    //serialPort.WriteLine(START_COMMAND);
    _looping = true;
    _serialPortReadingThread = new Thread(SerialPortReadingThread);
    _serialPortReadingThread.Start();
}
///
/// Reads the serial port continuously.
///
private void SerialPortReadingThread()
{
    while (_looping)
    {
        try
        {
            _receivedSingleMessage = _serialPort.ReadLine();
        }
        catch (Exception e)
        {
            if (e is TimeoutException)
            {
                Console.WriteLine("TimeoutException inside MyArduinoPlugin.cs");
                return;
            }
            else
                throw;
         }
        ParseData();
    }
}
You need to define the member variables I’ve used here. I’m skipping that here because I want to keep this tutorial short and clear. As mentioned before, you can find the complete project here.
If you see the message ”TimeoutException inside MyArduinoPlugin.cs” in your console, it means FreePIE has waited 10 seconds before it timeouts. Check you Arduino to make sure it is sending data to the COM port or whether FreePIE is listening to the right COM port.
ParseData() parses the received message and extract the position and rotation of the controller (= Arduino). The body of ParseData() totally depends on the format of the message. In my case, it is as follows:
///
/// Extract positional data from the message received from the arduino.
///
private void ParseData()
{
    // Extract position and orientation.
    // sample received message
    // pos: 1.00000,0.00000,1.00000 rot: 0.99985,-0.00356,-0.00462,-0.01626
    // which follows the format --> pos: x, y, z rot: pitch, roll, yaw
    var stringCollection = _receivedSingleMessage.Replace("rot:", COMMA)
                                     .Replace("pos:", COMMA)
                                     .Split(',');
    // We omit stringCollection[0] because it does not contain positional data and is empty.
    float posX = Convert.ToSingle(stringCollection[1]);
    float posY = Convert.ToSingle(stringCollection[2]);
    float posZ = Convert.ToSingle(stringCollection[3]);

    float pitch = Convert.ToSingle(stringCollection[4]);
    float roll  = Convert.ToSingle(stringCollection[5]);
    float yaw   = Convert.ToSingle(stringCollection[6]);

    _latestPosition = new MyArduino.Vector3(posX, posY, posZ);
    _latestData = new DofData();
7. Now it is time to implement the Read(…). This method body is short and simple:
protected override void Read(SerialPort serialPort)
{
    Position = _latestPosition;
    Data = _latestData;
    Thread.Sleep(1);
}
As you see, it simply copies data to Position and Data. The Position member variable that keeps x, y and z is not defined yet. We are going to define it in the parent class ComDevicePlugin. However, Data member variable is already defined in the parent class. In the next step, we are going to modify the parent class such that it defines the missing pieces.
8. Go the cs and add 921600 is in the list if you need it (optional).
foreach (var rate in new int[] { 1200, 2400, 4800, 9600, 14400, 19200, 38400, 57600, 115200, 921600 })
{
    property.Choices.Add(rate.ToString(CultureInfo.InvariantCulture), rate);
}
9. In the same class, add the member variable Position:
public Vector3 Position { get; protected set; }
Vector3 class is not defined in FreePIE. I have written this class and you can find it the provided code.
10. Add a constructor to DofData struct to make it easier to work with:
public struct DofData
{
    public float Yaw;
    public float Pitch;
    public float Roll;

    public DofData(float pitch, float roll, float yaw)
    {
        Pitch = pitch;
        Roll = roll;
        Yaw = yaw;
    }
}
11. Expose the Position member variable to IronPython script by adding px, py and pz properties to DofGlobal class:
public abstract class DofGlobal<TPlugin> : UpdateblePluginGlobal<TPlugin> where TPlugin : ComDevicePlugin
{
    protected DofGlobal(TPlugin plugin) : base(plugin){}

    public float yaw
    {
        get { return plugin.Data.Yaw; }
    }

    public float pitch
    {
        get { return plugin.Data.Pitch; }
    }

    public float roll
    {
        get { return plugin.Data.Roll; }
    }
    public float px
    {
        get { return plugin.Position.x; }
    }
    public float py
    {
        get { return plugin.Position.y; }
    }
    public float pz
    {
        get { return plugin.Position.z; }
    }
}
12. Override the Stop() method as follows:
public override void Stop()
{
    // (optional) Stop arduino.
    //_serialPort.WriteLine(STOP_COMMAND);
    //Thread.Sleep(200);

    // Stop the reading thread and wait for it.
    _looping = false;
    Thread.Sleep(100);

    _serialPortReadingThread.Join();
    _serialPortReadingThread.Abort();
    base.Stop();
}
By overriding this method, you can safely stop the Arduino and the reading thread.
13. (Optional step) Remove ReadFloat(…) We don’t need it.
14. Run the FreePIE (GUI project). Go to File > Open… and open hydra_setup_brief.py and add the following to the update () method:
def update():
handleStartButton()
diagnostics.watch(myArduino.px)
diagnostics.watch(myArduino.py)
diagnostics.watch(myArduino.pz)
diagnostics.watch(myArduino.roll)
diagnostics.watch(myArduino.pitch)
diagnostics.watch(myArduino.yaw)
index = 0 # there are two Vive controllers. Here we choose the one with index ‘0’ to represent our arduino.
hydra[index].x = myArduino.px
hydra[index].y = myArduino.py
hydra[index].z = myArduino.pz
hydra[index].roll = myArduino.roll
hydra[index].pitch = myArduino.pitch
hydra[index].yaw = myArduino.yaw;
15. Go to Settings > Plugins > MyArduino Plugin and select the COM port that is connected to your hardware (controller). Check the baud rate is correct and then click Ok. Make sure no other program is connected to the same port. Otherwise, your application cannot read the port.
16. Run the script (Script > Run script). In the “Watch” pane below the script, you should be able to see the values of px, py, pz, roll, pitch and yaw (because we used diagnostics.watch(…) on them). Also if everything works properly, you should be able to see the hydra controller in virtual reality is moving and rotating when you move or rotate your controller.
Note: The SteamVR coordinate system is likely different from your controller coordinate system. That causes the hydra controller moves differently from what you expect. You should find the mapping between your controller coordinate system and SteamVR’s. (SteamVR coordinate system: right-handed system, +y is up and distance unit is meter).

im here in 2022 with the new ide and your code has alot of errors
LikeLike
If you provide more details I might be able to help you to resolve the errors.
LikeLike
Greetings!
I’m attempting to use this idea to interface PSMoveService -> FreePIE -> Razer Hydra -> SteamVR.
There’s one thing I just can’t figure out, what kind of rotations SteamVR expects? Euler Angles, Tait-bryan angles, or something else? Do you have any idea?
LikeLike
I have a question: Almost everything works for me, but i don’t understand the code for the arduino to send the serial data so freepie can actually read it. It says it reads the format: ‘pos: x, y, z rot: pitch, roll, yaw’ but if i try serial.print/println/write, freepie crashes, or i get the timeout error you described above. Do you have the code you used to send the data on the arduino?
LikeLike
Okay, i now got the position working by sending ‘pos: 1,2,3 rot: 4,5,6,7’ over the serial, but it says the pitch, yaw and roll are 0.
LikeLike
I got the x, y, z, roll, pitch and yaw to work, but once in a while freepie crashes because of the number being outside the array. if i edit the arduino script, it works again. If it crashes again, i have to change the script back again.
I want to make it work with MPU6050 to calculate the exact position. But the calibration-script for the MPU6050 in the library i use breaks the serial communication. Still have to figure something out about that. It just gives an error.
Else i have to find a different way to calculate the exact position of the hand controllers.
LikeLike
Good tutorial but I ended up with some error and as a newbie to this language I am not able to understand it very well. This tutorial got me closest to what I wanted.
First: There is an error of out of bounds exception in the array where the data from the arduino is collected and extracted. I can restart the program a couple of times to get it running.
Second: I tried adding a functionality that when you press “W” you can use the trigger button but the free pie script just freezes and even if I reverse the code back it doesnt help
LikeLike